Beckys Bridal Formal Fabrics Uncategorized How to Fix a Gap in Guttering: A Step-by-Step Guide

How to Fix a Gap in Guttering: A Step-by-Step Guide

How to Fix a Gap in Guttering: A Step-by-Step Guide post thumbnail image

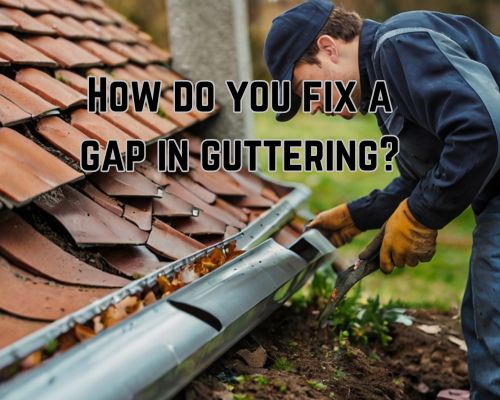
If you have noticed a gap in your guttering, it is important to fix it as soon as possible to prevent water damage to your home. A gap in your guttering can cause rainwater to flow down the side of your house, leading to water damage to your walls, foundation, and landscaping.

The good news is that fixing a gap in your guttering is a relatively simple process that you can do yourself with the right tools and materials. Let us know more with Gutter Cleaning near me.

working fixing the gutter gap

Before you start repairing your guttering, it is important to identify the cause of the gap. Common causes of gaps in guttering include rust, corrosion, and damage from fallen branches or debris.

Once you have identified the cause of the gap, you can start repairing it.

Depending on the severity of the gap, you may need to replace a section of your guttering or simply patch the gap. Regardless of the method you choose, it is important to make sure that your guttering is properly sealed to prevent future leaks.

Identifying Guttering Issues

Assessing Gutter Damage

Before you can fix any issues with your guttering system, you need to identify what the problems are. The first step is to assess the damage to your gutters.

Common types of damage include sagging, cracks, rust, and rot.

Inspect your gutters for any signs of sagging or unevenness. This can be an indication of damage to the brackets or hangers that hold the gutters in place.

Check for cracks or holes in the gutters, which can cause leaks and overflow. Rust and rot are also common issues, especially in older gutters.

Detecting Leaks and Gaps

Another common issue with gutters is leaks and gaps. Leaks can occur when there are cracks or holes in the gutters, while gaps can happen when the gutters pull away from the roofline.

These issues can cause water to overflow and damage your home’s foundation.

To detect leaks and gaps, inspect your gutters for any signs of water damage or stains on the exterior walls. You can also run water through the gutters to see if there are any leaks or gaps.

Look for any debris that may be clogging the gutters, as this can cause water to overflow and create gaps.

Repairing Guttering

If you have noticed gaps or leaks in your guttering, it is important to repair them as soon as possible to prevent further damage to your home. Here are some DIY tips to help you repair your guttering and avoid costly professional repairs.

Fixing Small Holes and Cracks

Small holes and cracks in your guttering can be easily fixed with a waterproof sealant.

First, clean the damaged area with a wire brush to remove any rust spots or debris. Then, apply the sealant with a caulking gun, feathering the edges to ensure a smooth finish. Allow the sealant to dry completely before testing with a garden hose.

Realigning and Resealing Joints

If your guttering is leaking at the joints, it may need to be realigned and resealed. To do this, first, remove any screws or hangers holding the guttering in place. Then, clean the joint area with a wire brush and apply a gutter sealant. Finally, reattach the guttering with new screws or hangers.

Replacing Damaged Sections

If your guttering is severely damaged, you may need to replace the damaged sections. To do this, first, remove any screws or hangers holding the damaged section in place.

Then, cut the damaged section out with a saw and replace it with a new section. Finally, reattach the guttering with new screws or hangers.

Make sure that your guttering is properly supported and level to prevent water damage to your home. Use gutter brackets and straps to support your guttering. Also, ensure that it is sloped correctly for proper drainage.

Remember to always take safety precautions when working on your guttering, including using a ladder and wearing appropriate safety gear.

By following these DIY tips, you can repair your guttering and avoid costly professional repairs. However, if your guttering is severely damaged or you are not comfortable with DIY repairs, it is best to request a quote from a professional like Gutter Cleaning near me.

Related Post

leaking-kitchen-sink-pipe

How Much Does It Cost to Fix a Leaking Pipe Under a Sink? A Comprehensive GuideHow Much Does It Cost to Fix a Leaking Pipe Under a Sink? A Comprehensive Guide

If you have a leaking pipe under your kitchen sink, you may be wondering how much it will cost to fix. The cost of repairing a leaking pipe can vary depending on the severity of the leak and the required repairs.

In this article, we will break down the factors that can affect the cost of fixing a leaking pipe under your sink.

leaking kitchen sink pipe

One of the factors that can affect the cost of fixing a leaking pipe is the location of the leak. If the leak is in a hard-to-reach area, such as behind a wall or under the floor, the repair may be more complex and time-consuming, which can increase the cost.

Additionally, the severity of the leak can also impact the cost. A minor leak may only require a simple repair, while a major leak may require more extensive repairs or even a replacement of the plumbing system.

If you are not experienced in plumbing repairs, it is recommended that you hire a licensed plumber like Plumbers Warragul to fix the leak. A plumber will have the knowledge and experience to diagnose the problem and provide an accurate estimate of the repair costs.

In the next section, we will discuss the average costs of fixing a leaking pipe under a sink, based on industry data and research.

Identifying the Source of the Leak

Assessing the Damage and Location

The first step in fixing a leaking pipe under your sink is to identify the source of the leak. Start by examining the area under the sink for any signs of moisture or water damage.

Check the walls, floors, and ceilings around the sink for any signs of water damage. If you notice any water stains or wet spots, it’s likely that there is a leak under the sink.

Next, turn off the water supply to the sink and open the faucet to drain any remaining water from the pipes. Use a towel or bucket to catch any water that may still be in the pipes.

Once the pipes are drained, inspect all of the plumbing fixtures under the sink, including the drain pipe, P-trap, washers, gaskets, and O-rings. Look for any signs of corrosion, loose connections, or damage to the fixtures.

Common Causes of Leaks Under the Sink

There are several common causes of leaks under the sink. One of the most common causes is a loose connection between the faucet and the water supply line. If the connection is loose, water can leak out and cause damage to the surrounding area.

Another common cause of leaks under the sink is a damaged P-trap. The P-trap is the curved pipe that connects the sink drain to the main drain line. If the P-trap is damaged or becomes clogged, water can leak out of the sink and cause damage to the surrounding area.

Other common causes of leaks under the sink include damaged washers, gaskets, and O-rings, as well as corrosion on the plumbing fixtures. If you notice any signs of damage or corrosion, it’s important to replace the damaged parts as soon as possible to prevent further leaks and water damage.

In some cases, the source of the leak may be more difficult to diagnose. If you’re unable to locate the source of the leak, it may be necessary to call a professional plumber to diagnose and repair the problem.

Repair and Replacement Options

When to Call a Plumber

If you have a leaking pipe under your sink, you may be tempted to try to fix it yourself. However, it is important to know when to call a plumber.

If you are not experienced with plumbing jobs, it is best to call a plumber like Plumbers Warragul to avoid making the problem worse. Additionally, if the leak is severe or if you do not have the necessary tools, it is best to call an experienced plumber.

In an emergency plumbing service, a plumber will be able to assess the situation and determine the best course of action. They will have the necessary experience, equipment, and materials to fix the leak or replace the pipe if necessary.

Cost Factors for Fixing Leaks

The cost of fixing a leaking pipe under a sink can vary depending on a number of factors.

Some of the factors that can affect the cost include the severity of the leak, the age of the plumbing system, and the type of pipe that needs to be replaced.

If the leak is severe, it may require an emergency plumber, which can increase the cost. Additionally, a corroded or broken shut-off valve may need to be replaced, which can also increase the cost.

The cost of a plumber can also vary depending on the plumber’s experience. An experienced plumber may charge more than a less experienced plumber. Some plumbers may also charge a call-out fee, which can also increase the cost.

When it comes to pipe replacement, the cost can vary depending on the type of pipe that needs to be replaced.

For example, copper pipes can be more expensive than PVC pipes. The cost of materials and equipment can also affect the overall cost of the repair or replacement.

Download UNKILLED For Android Right From The App StoreDownload UNKILLED For Android Right From The App Store

If you are looking for a good game to download to your phone, Unkilled for Android is the one. The developers have put out a very exciting game for you to download and enjoy. Unkilled apk is an exciting game that you must play as a military soldier whose life is in danger and who must save nyc form infection by the zombies. This is one of those games that are completely different from the others. Best looking zombie shooting game ever which you haven’t seen on an android phone yet.

The story of Unkilled for android is based on a novel called “The Zombie Files” written by James Patterson. This is one of the top selling books on Amazon Kindle and I am sure that it will get even more popular once the mod becomes available for everyone to download. When you start playing, you will be in command of a small group of optimally positioned soldiers. You will have to save as many lives as possible and fight off waves of zombies with their automatic weapons until you reach the final room.

You can purchase new weapons, increase your skill level and choose your path in life when you start the game. But you will also need to earn credits to buy these things and continue your mission. These credits are earned after completing the single mission or you complete all the missions in the single play mode. The combat is done by tapping the screen and playing a sequence of short missions which open up as you advance further into the game.

All of these missions can be played alone or you can compete with other players online to complete as many as you can. There are a total of 19 different levels in the single player campaign and a couple of bonus levels as well. Although the single player campaign has slightly different gameplay than the multi-player versions, it contains all the same content and features. The story is presented in a point and click style format, and there are several collectibles along the way to collect which include items that give you special skills and abilities as well as weapons and other zombie killing tools.

https://alogum.com/vi/unkilled-zombie-games-fps

https://alogum.com/unkilled-multiplayer-zombie-shooter

However, the multiplayer component of this game offers a much more engaging experience as you can battle against waves of zombies using only your arrow keys and utilize each of the weapons available to destroy them. The game offers five separate game modes, which range from the traditional ‘action’ mode where you take control of a squad of soldiers battling it out against waves of zombies in order to claim a particular zone, to the highly competitive ‘coop’ mode which pits you up against another team of human players for a chance to earn the highest score possible. The maps here range from fairly small to very large and the difficulty increases as you go further in the game’s various modes. Additional challenges are offered through a number of bonus objectives, which will help to stretch and enhance your zombie survival skills.

The downloadable version of UNKILLED for Android provides the same content that is found on the iPhone and iPad versions but also provides two new game modes, two new weapons, and four new collectible skins to collect and equip your soldiers with. New ways to eliminate hordes of zombies using new techniques and methods are offered in both the single and multiplayer versions of the game. These additions make UNKILLED an exciting and engrossing offering that anyone who owns an Android phone should download immediately. Add in the exciting and engaging gameplay of both the single and multi-player battles, and you have the recipe for a real stand-alone success.

A detailed overhead view of the plumbing layout in a modern, spacious home with multiple interconnected pipes and fixtures

What is the Plumbing Layout? Understanding Home Water SystemsWhat is the Plumbing Layout? Understanding Home Water Systems

A plumbing layout is a detailed diagram that displays the arrangement and connection of pipes, fixtures, and other plumbing components within a building.

This layout is crucial for ensuring your plumbing system functions efficiently and complies with the relevant plumbing codes.

Whether considering a kitchen, bathroom, or entire house, a comprehensive plumbing layout helps avoid potential problems and ensures all fixtures, drains, and vent systems are correctly installed.

A detailed overhead view of the plumbing layout in a modern, spacious home with multiple interconnected pipes and fixtures

When planning a bathroom plumbing layout, codes like the International Plumbing Code specify clearances and fixture placements to ensure safety and functionality.

Knowing these guidelines can help you design a bathroom that maximises space while ensuring all plumbing elements are accessible and effective.

“It is important to note that all plumbing layouts should be meticulously planned to avoid surprises during the actual installation.” said Dean Owens from Plumber Warragul.

A well-designed plumbing layout not only assists in the initial setup but also facilitates future maintenance and upgrades.

For a complex system such as plumbing, having a clear and precise layout can be a lifesaver when it comes to troubleshooting or enhancing existing setups.

A detailed plumbing diagram serves as a blueprint for your entire domestic water system, making it an indispensable tool for any homeowner or professional plumber.

Understanding Plumbing Systems

Plumbing systems are essential for both water supply and waste removal in any residential or commercial building. This section covers the main components and the interaction between water supply and drainage.

Components of a Plumbing System

A typical plumbing system consists of various pipes, fittings, and fixtures.

Pipes can be made from different materials like PVC, copper, and PEX.

  • PVC pipes: Common for drainage due to their durability and ease of installation.
  • Copper pipes: Often used for hot and cold water supply lines due to their heat resistance and longevity.
  • PEX pipes: Flexible and easy to install, suitable for various applications.

Plumbing fixtures such as sinks, toilets, bathtubs, and showers are connected to the system via valves and fittings. These components manage water flow and pressure within your home.

Each plumbing fixture typically includes a P-trap to prevent foul gases from entering.

Additionally, vent pipes help maintain proper air pressure in the drainage system.

Water Supply and Drainage

The water supply system begins at the main water line which brings cold water into your property. From here, the water is divided into hot and cold lines.

  • Hot water systems often include a water heater.
  • Cold water supply lines directly connect to fixtures like sinks and toilets.

In comparison, the drainage system handles waste removal.

Drain pipes transport waste from fixtures to the sewage line or septic tank.

Toilet drains, sink drains, and bathtub drains all connect to larger drain lines.

To ensure efficient drainage, proper installation of vent pipes is critical. These pipes allow air flow and prevent vacuum locks that can disrupt the drainage process.

Efficient plumbing systems also feature shut-off valves which allow you to control water flow for maintenance or emergencies.

Proper planning and installation ensure optimal water pressure and effective drainage.

Design and Installation Techniques

Effective design and installation techniques are critical for ensuring a functional plumbing system. With Dean Owens from Plumber Warragul, here, we’ll address essential strategies for layout planning and compliance with codes and regulations to achieve an efficient and leak-free system.

Layout and Venting Strategies

When planning a bathroom plumbing layout, accurate placement of fixtures such as the toilet, shower head, and vanity is essential.

Water supply lines should be organised to minimise water waste and travel distance.

Using a bathroom plumbing diagram can help visualise the system, ensuring that all connections and centerlines are aligned correctly.

Slope plays a crucial role in drainage.

Pipes must be angled correctly to ensure smooth water flow.

For instance, a general rule for household drainage pipes is a slope of 1/4 inch per foot.

Additionally, incorporating cleanout plugs and venting systems is vital to avoid bad odours and allow for maintenance access.

Incorporate DWV fittings in your design to seamlessly connect pipes, and ensure the proper use of a closet flange for toilets and vanity units.

This will facilitate effective water flow and proper ventilation.

Always use a diagram to guide your installation steps and double-check all connections to avoid leaks.

Codes and Regulations

Adhering to plumbing codes and regulations is essential to ensure your system meets legal and safety standards. The International Plumbing Code (IPC) is one of these codes.

These codes dictate the minimum requirements for pipe sizing, fixture placement, and venting. This is to prevent leaks and ensure proper ventilation.

Plumbing symbols and clear labelling on plumbing diagrams are essential for both professional plumbers and DIYers. This includes documenting slope requirements, vent stack placement, and specific fittings like flush bushing and closet bends.

Make sure you consult local building codes, as requirements might vary by jurisdiction. Maintaining these standards guarantees that your plumbing system is safe, efficient, and durable.

Proper rough-in measurements and consistent checks against the codes will help avoid costly errors and reworks.